
kniterate notes 3
This is the third in a series of blog posts about the Material Programming Project. We are developing malleable knitting software for the Kniterate, a semi-industrial knitting machine. The first post, on the Knitout project, is available here, and a longer post about the Kniterate machine is here. The next post includes more detail about Kcode.
B, Rosie and I met this week to work on knitout generation for the Kniterate, and plan the first programming-based session for the material programming workshop series. We started by trying to articulate exactly what it is we’re trying to achieve (both with the workshops, and with the project more generally) in concrete, technical terms:
 A 2.5D milling workflow for the Roland MDX20 in mods. The same workflow could easily be adapted for another mill, a laser cutter, vinyl cutter or embroidery machine.
- open knitting file formats are in a ~larval stage and aren’t widely used outside of academia
- in general, interesting (open-source, malleable) CAD software benefits hugely from the benefit and adoption of machine-agnostic and interchangeable file formats
- the adoption of new kinds of file format requires usable and accessible tooling: it’s not enough for them to just exist
- if we can make something our students can use, chances are other people will be able to use it too
A big part of this work is to get the existing tools into a form our students can use, while also properly articulating the backend structure both for ourselves and for anyone else who wants to tinker with things under the hood. Examples of places this has been done well in the wider world include the mods project, a modular tool for rapid prototyping used for the control and automation of a wide variety of CAD machines, open-source 3D printing software, and open-source embroidery projects like PEMbroider and p5.embroider.
open knitting file formats
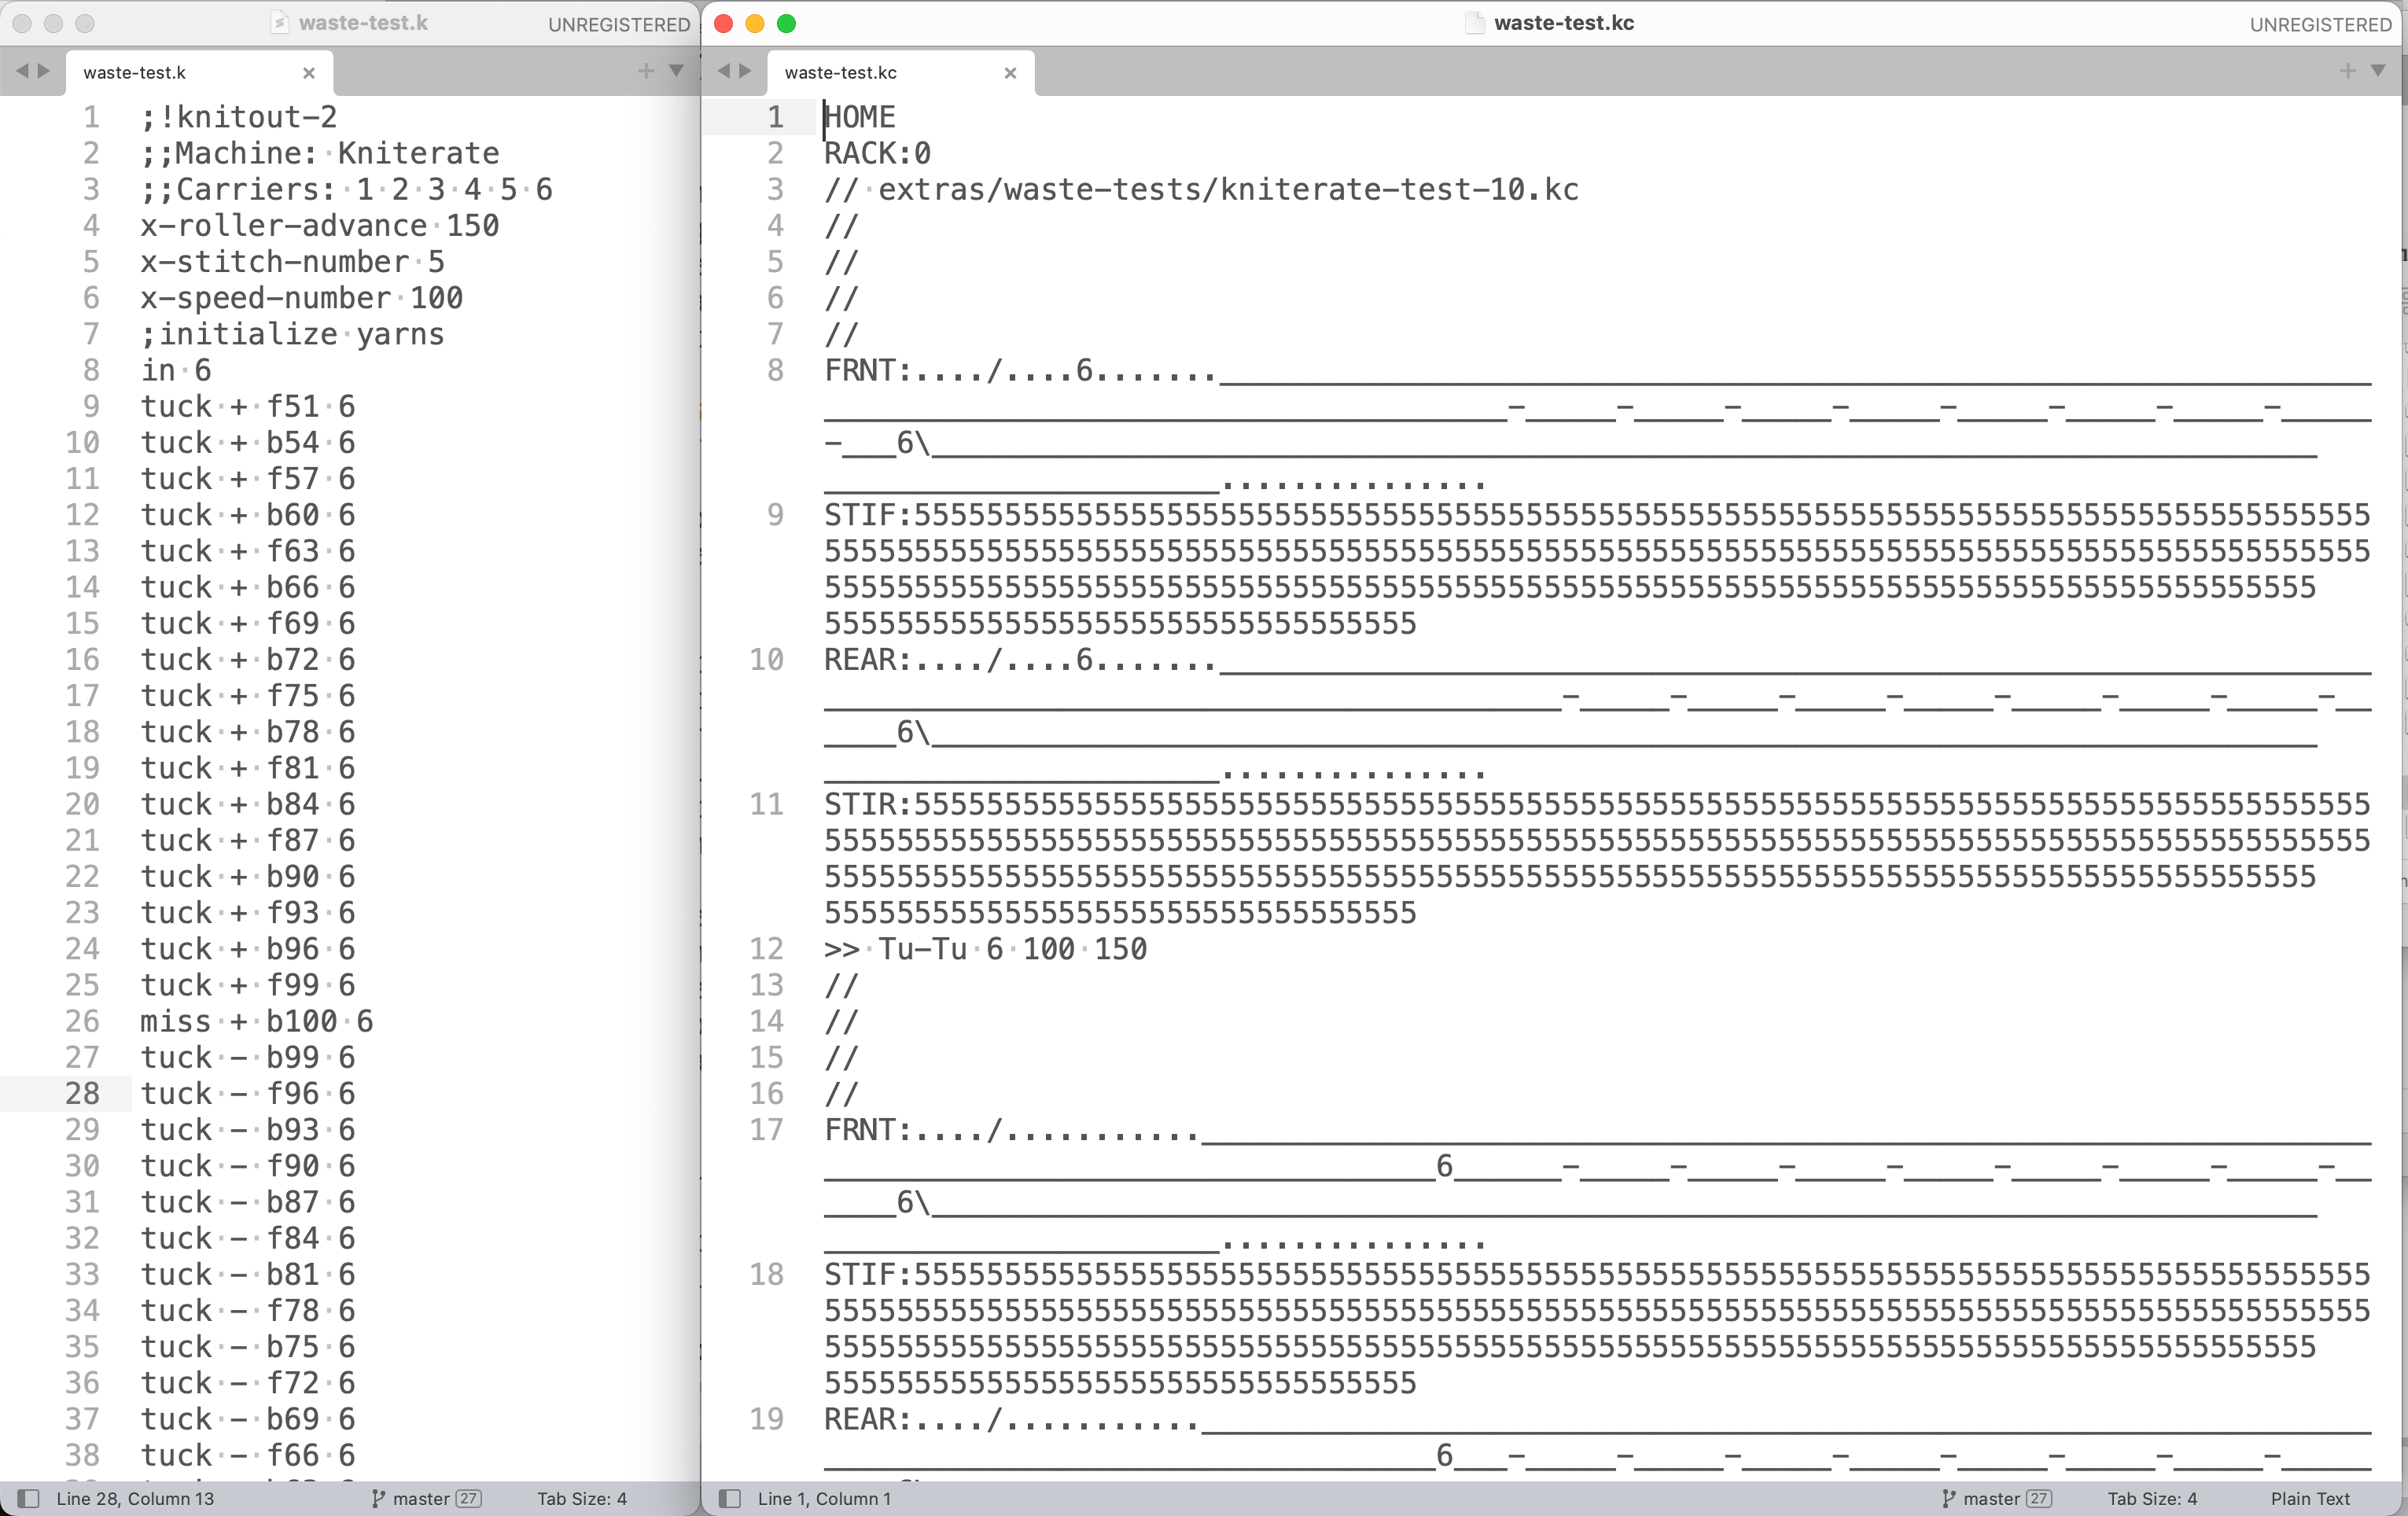 The same file in knitout (left) and kcode (right) format
One thing that’s become apparent with this project is how quickly the different knit file formats can get confusing, especially with the naming similarity between Knitout and Kniterate. To add to the confusion, most of these file formats can be converted in one direction, but not another: for example, it’s possible to convert knitout to kcode, but not currently possible to do it the other way around.
Here’s a summary of some key file formats, plus links to sample files. The main ones we’re concerned with in this project are .kc and .k files, but the other two are also worth thinking about.
| file type | ending | usage |
|---|---|---|
| kcode | .kc | Plaintext file that runs on the Kniterate. Made in the Kniterate editor or by converting a Knitout file using the knitout-backend-kniterate tools. |
| knitout | .k | Open interchange format developed by CMU textiles lab. Considerably more human-readable than .kc files. |
| dak | .txt | Designaknit export format, has an interesting pictoral representation. Plaintext. Screenshot examples here |
| DAT | .dat | Shima Seiki export format. To my knowledge, this is a binary file format. CMU have a closed repo which generates these files from Knitout |
 the ‘load txt file pattern’ layer interface in the Kniterate editor loading a compatible file
dak export files
We’d reached out to Gerard from Kniterate a few weeks ago to ask about importing Kcode and/or knitout files into the Kniterate editor directly. To our knowledge, this isn’t currently possible, but it turns out that the editor does have a plaintext import function, but for .txt files generated from Designaknit 9 (DAK9), accessed through the layers editor. This is done (in a similar way to other Kniterate Editor operations) by adding a layer called ‘Load txt file pattern’.
These .txt files have yet another really specific file format: in this instance, an almost pictoral format that includes the shaped file made up of individual stitches, once containing carrier information, and a second time containing stitch types, plus a set of metadata at the top. As far as I can make out, this doesn’t include information about racking, transfers etc: presumably you add that in once you’re in the Kniterate editor. So, while it would probably be possible to write a knitout-to-dak-txt conversion script, in the end we’d lose a lot of information that knitout already does a good job of encoding.
 an excerpt of the DAK txt export pattern, showing header metadata and then shaped carrier information
Although it’s not essential for running .kc files on the machine, longer-term it would be ideal to be able to import generated .kc files into the Kniterate editor. This is partly because it feels like it should be possible and would open up a lot of cool plugin options, but also more concretely to be able to perform checks on the files before running them on the machine to avoid breaking stuff.
extras
![]() an example knit file rendered in the knitout visualiser (left) and Shima Seiki visualiser (right)
an example knit file rendered in the knitout visualiser (left) and Shima Seiki visualiser (right)
- As part of attempting to find some example Shima files online, I came across the knitscript wiki, which seems a bit incomplete, but was attached to a really interesting paper on scripting languages for knit. A scripting language can work with live machine state – very cool future direction!
- There’s also the DAK Stitch Pattern (.stp) file format, which programmer Tom Price managed to reverse engineer a few years back.
- While digging around for Shima files, I re-found the knittingutils repo, which seems to have been doing a similar thing to us (helper functions and machine-specific translations) for the Shima a few years back. While there aren’t any sample Shima files, they did have this great side-by-side comparison of the Knitout visualiser with the Shima software
file format questions
- Are there any pieces of knit software which generate or convert to knitout currently? That would be a cool feature, even for something like DAK.
tool development
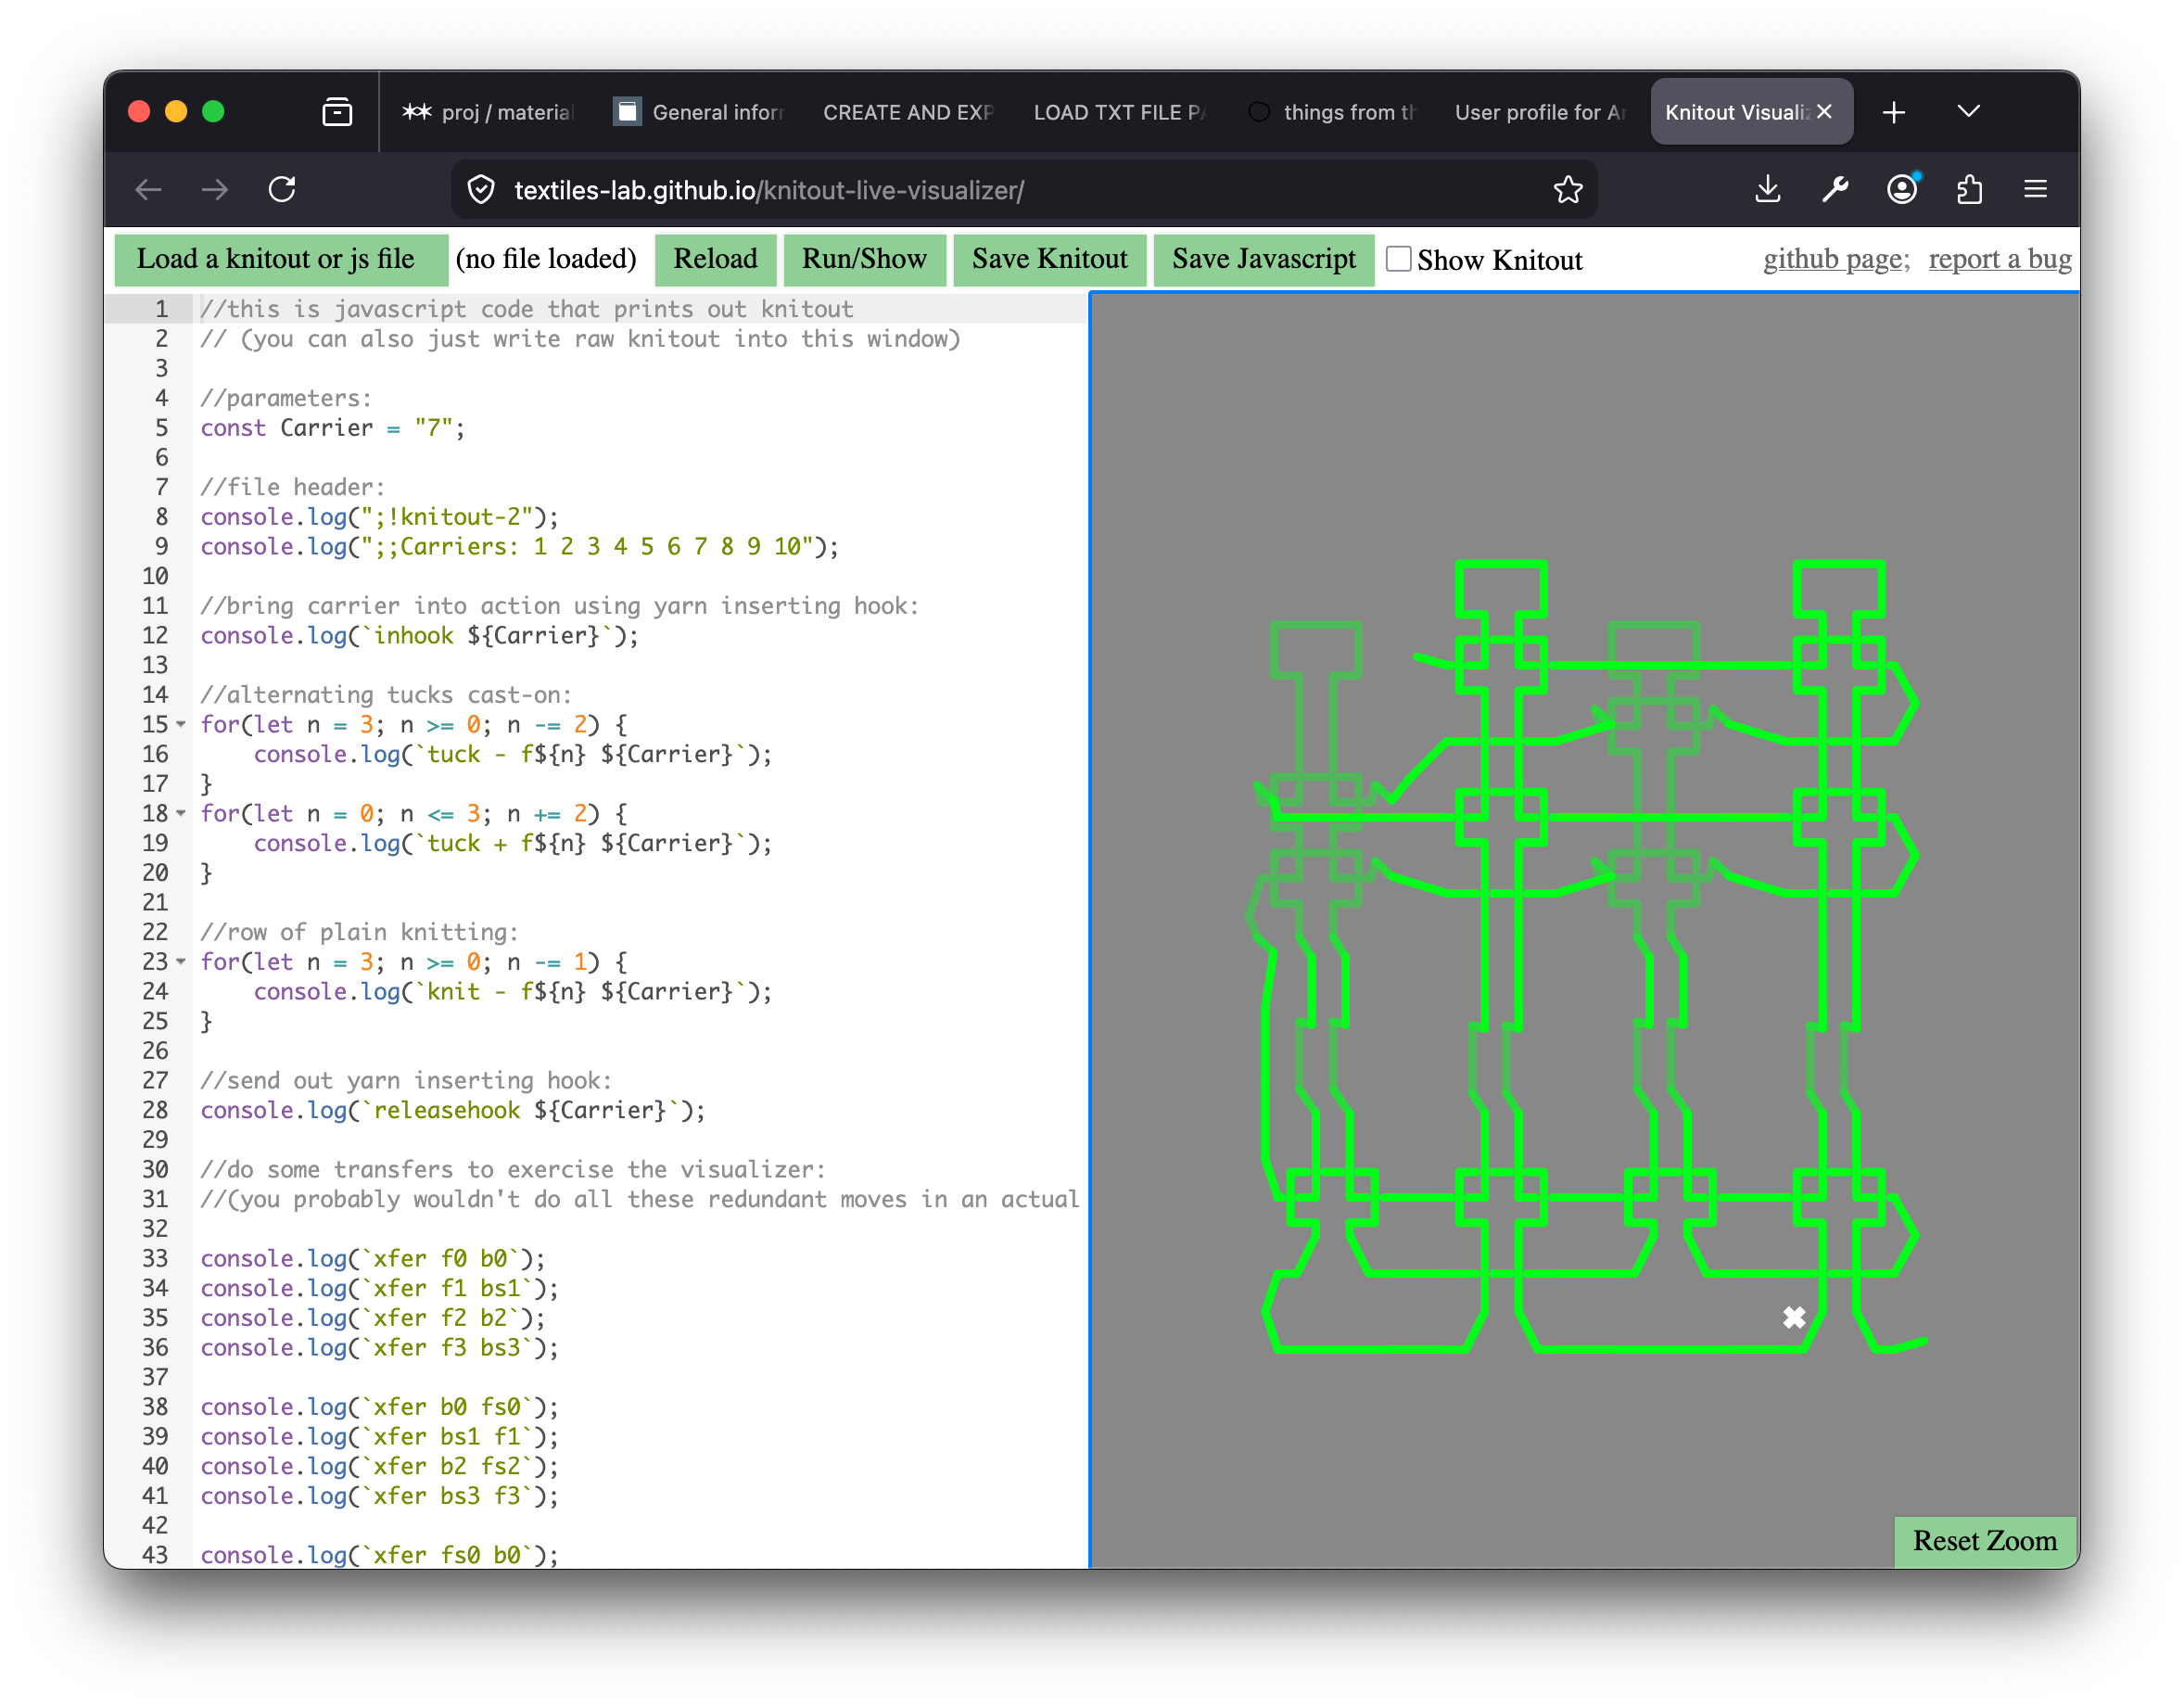 JS code generating knitout visualised in the Knitout Visualiser
We are working on a fork of the Knitout visualiser that allows students export .kc files that will run on the Kniterate directly from the browser. As many will be totally new to Javascript, having something browser-based and not reliant on running command-line scripts to generate Kniterate-ready files should save us a lot of confusion. Our first task is to replicate the cast-on process from the Kniterate editor using the knitout-frontend tools, so the waste section is reliably knit by our machine.
Ideally, we’ll end up with something akin to the knitting utils repository, which seems to do a similar thing for the Shima Seiki machines, adding a layer of helper functions on top of the knitout frontend code.
waste section generation
To get started, I made a fork of Gabrielle Ohlson’s knitout-backend-kniterate repo, creating a new script based on her waste section generating script. The original waste-section.js produces something fairly similar to the Kniterate editor, but in previous testing sessions we had run into some issues bringing the carriers in, and wanted to test out a more exact recreation of the Kniterate waste section.
The first part of this was also understanding the waste section itself. To explain a bit more about why waste sections are structured the way they are, B shared with us a set of instructions for casting on the dubied machines, which are manually-operated industrial machines and the precursor to modern industrial machines like the Stoll and Kniterate. It was interesting to read these, both to think about the idea of non-electrified industrial machinery (still used today!) and also to get a sense of the added complexity required to produce replicable results on large, fine-gauge industrial machines.
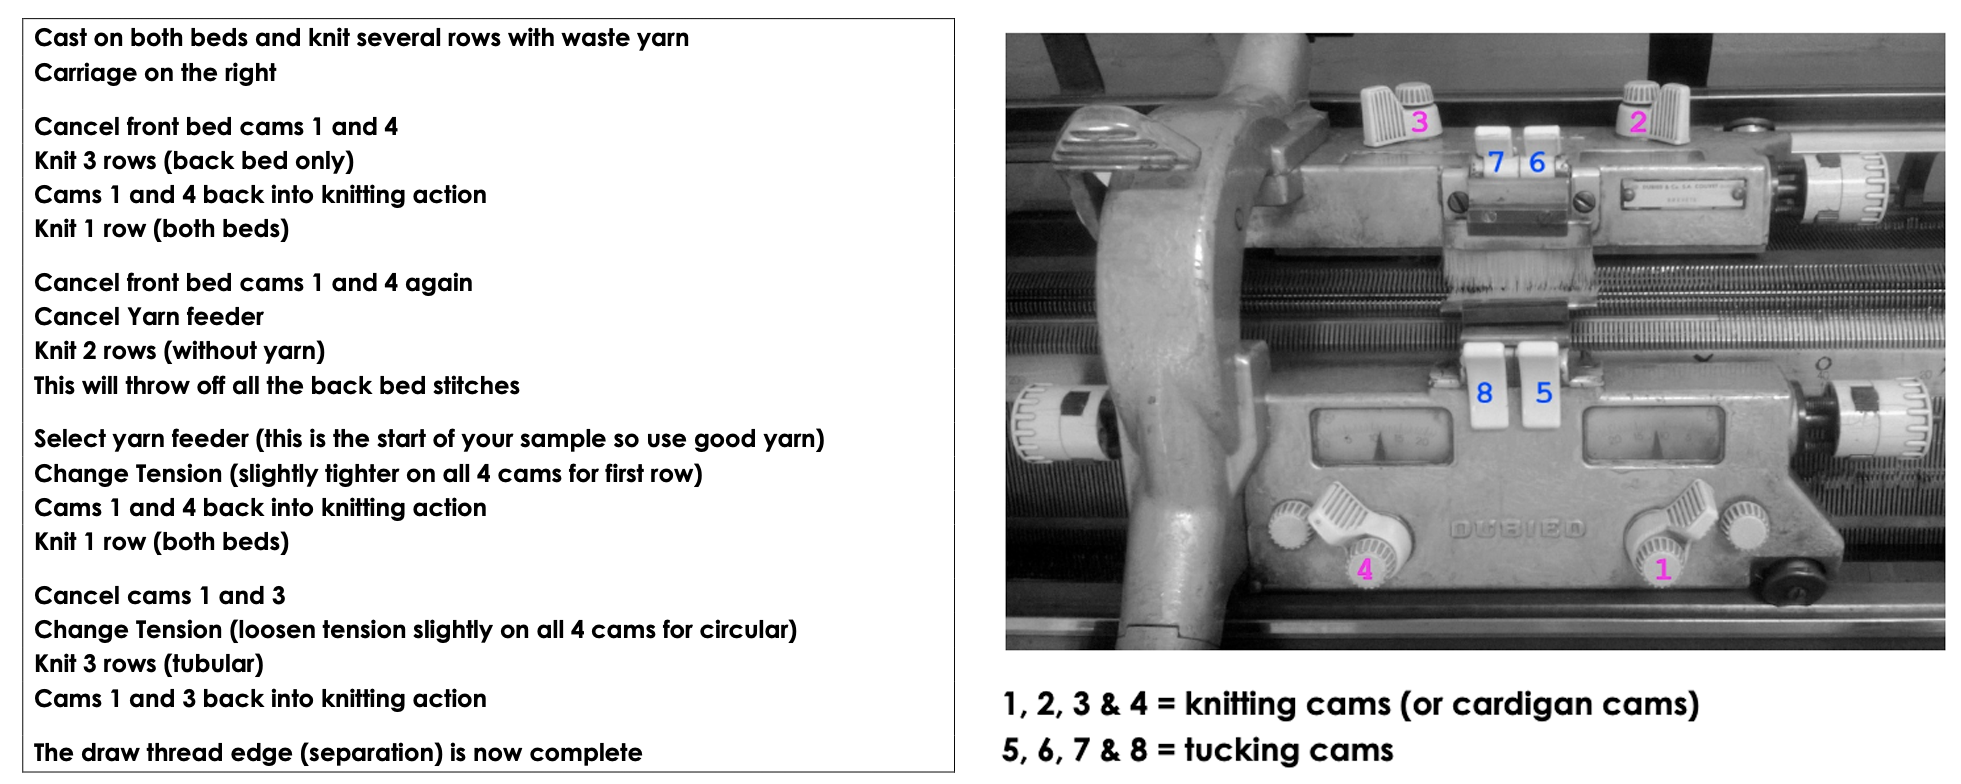 cast-on instructions for the Dubied machine
Increasingly, I think about the ‘industrial-ness’ of these machines as compensating for the added difficulty of managing yarn tension, dropped stitches etc when you can’t use your hands. Hearing B talk about the difference even between a Kniterate, where you can go in and move the needles and carriers around, and a Shima Seiki, which is essentially just a closed cabinet that spits out knitted fabric, also illiustrates this.
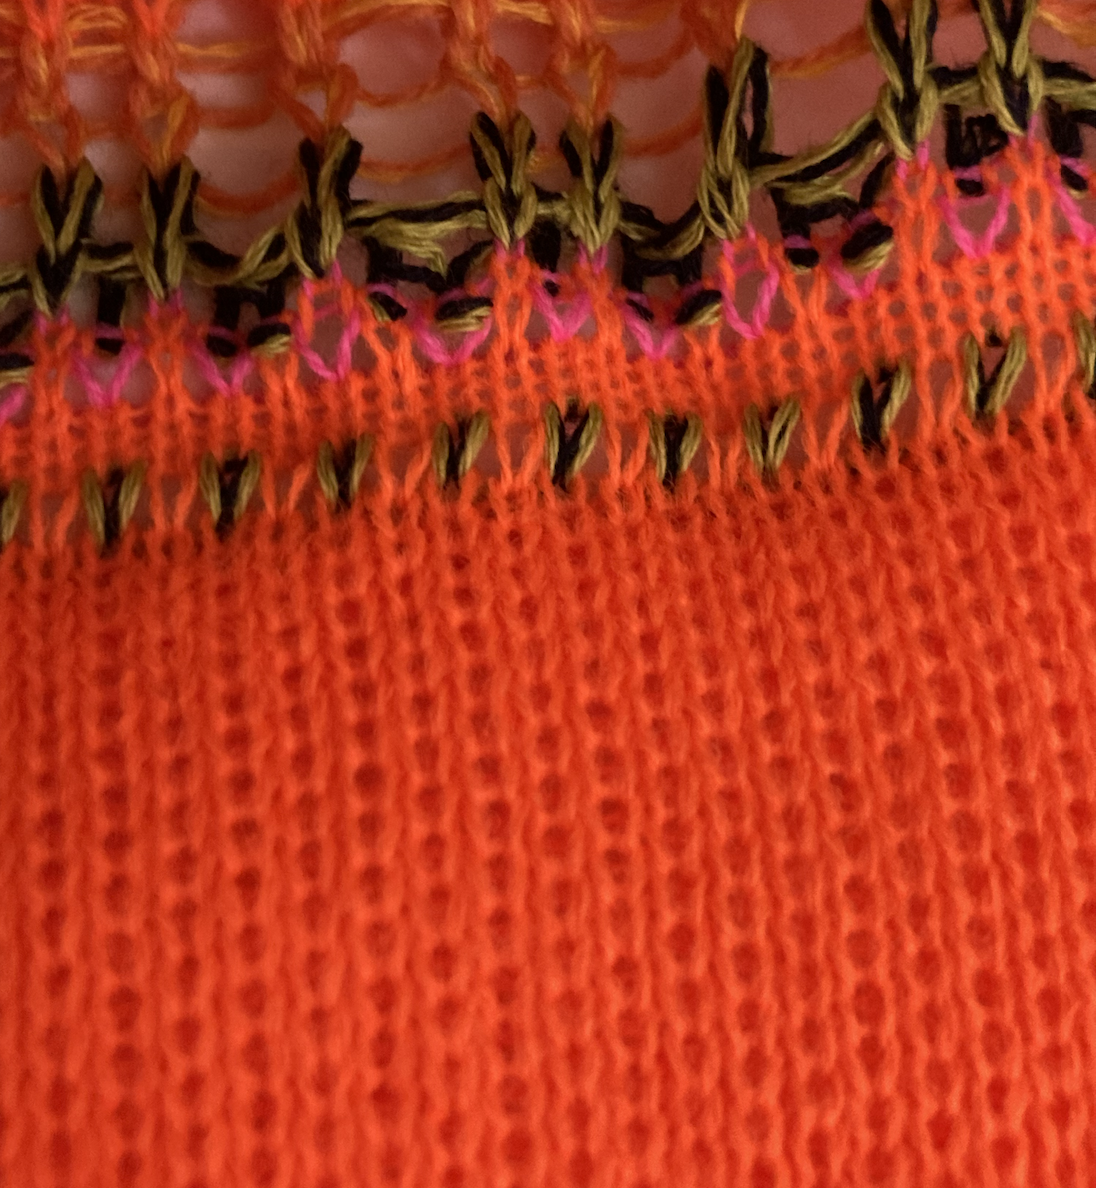 The waste section of a sample made in the kniterate editor, showing the looser, thicker section of alternating front and back bed stitches of waste yarn (orange) at the bottom, followed by rows of cast-on yarn (plated green/black) and draw thread (pink). Note that this sample failed, and a second waste section is initialised after the red-brown yarn toward the top of the image.
While I’ve not used a Dubied, even just imagining the extra weight of the carriage and the fine-gauge needles feels like the intention of the machine is to rely much less on manual sensation: in order to do this, the fabric must be made predictable in other ways. The waste section is one part of this process – setting the sample up to be as predictable as possible, bringing all the carriers in one-at-a-time to minimise the likelihood that something goes wrong.
carriers
Translating between the tools forced us to really engage on every line with exactly what was happening in the Knitout code, and how that corresponded to what was going on in both the Kniterate editor files, and then on the machine. One thing we struggled with initially was getting the carriage direction correct to bring in each yarn – you need to start the row from the side where the relevant carrier has last ended up. When this is wrong, you can see the path the yarn takes from one side of the material to the other as a float in the interface.
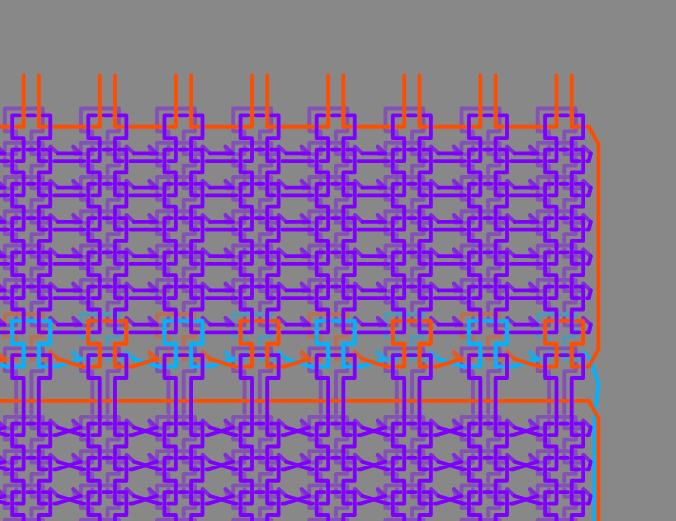 floats visible in the red draw-thread yarn as it's brought in
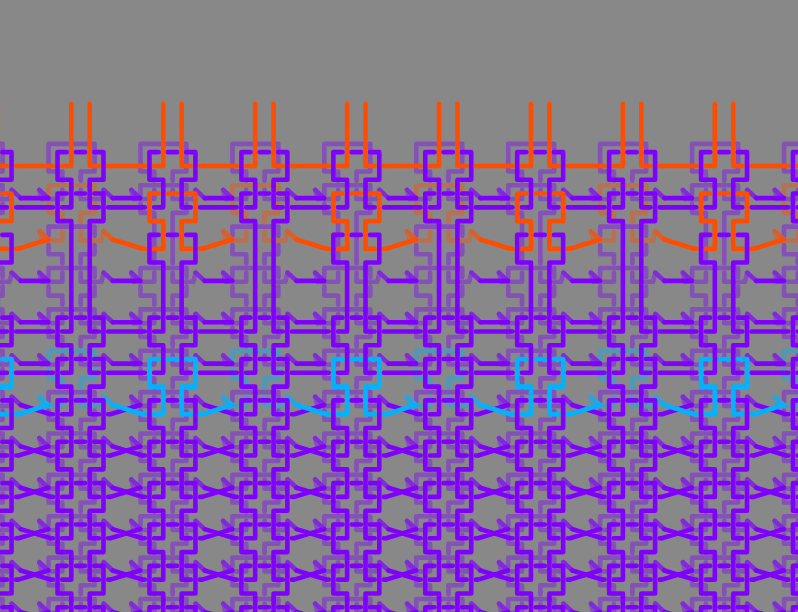 changing the carriage direction for those rows brings in the yarn correctly
One thing that was consistently challenging was trying to work out if what we were seeing rendered in the Kniterate editor was the same as what we were seeing in the knitout visualiser. A particular point of confusion was the first part of the waste yarn, where stitches on the same row alternate between front and back beds. In the Knitout visualiser, these appear (visually) to being passed between same-numbered needles on each bed (and also the stitches appear to be performed by each needle, rather than every other needle). Only after checking the knitout code directly does it actually seem to be equivalent.
I later learned that this stitch type is called an interlock.
in this video, you can see the carriage moving towards a carrier threaded with plated yarn, and then bring it across the bed, knitting a row. It’s also possible to see the stitches passed between the front and the back beds.
The code excerpt below initialises this alternating-bed section. On even numbered rows, the carriage travels in the positive (left-to-right) direction. On the front bed, even-numbered needles are knit, and on the back bed, odd numbered needles are knit. The needle assignment and direction is then flipped for the odd-numbered rows, resulting in the same texture as seen in the Kniterate editor.
// waste section
wasteSection.push(`;waste yarn section`);
for (let p = 0; p < wastePasses; ++p) {

  // even numbered rows in +ve direction
  if (p % 2 === 0) {
    for (let n = wasteMin; n <= wasteMax; ++n) {
      if (n % 2 === 0) {
          wasteSection.push(`knit + f${n} ${wasteCarrier}`);
        }

        else {
          wasteSection.push(`knit + b${n} ${wasteCarrier}`);
        }
      }
  }

  // odd numbered rows in -ve direction
  else {
    for (let n = wasteMax; n >= wasteMin; --n) {
      if (n % 2 === 0) {
          wasteSection.push(`knit - b${n} ${wasteCarrier}`);
       }

       else {
          wasteSection.push(`knit - f${n} ${wasteCarrier}`);
       }
      }
  }
}
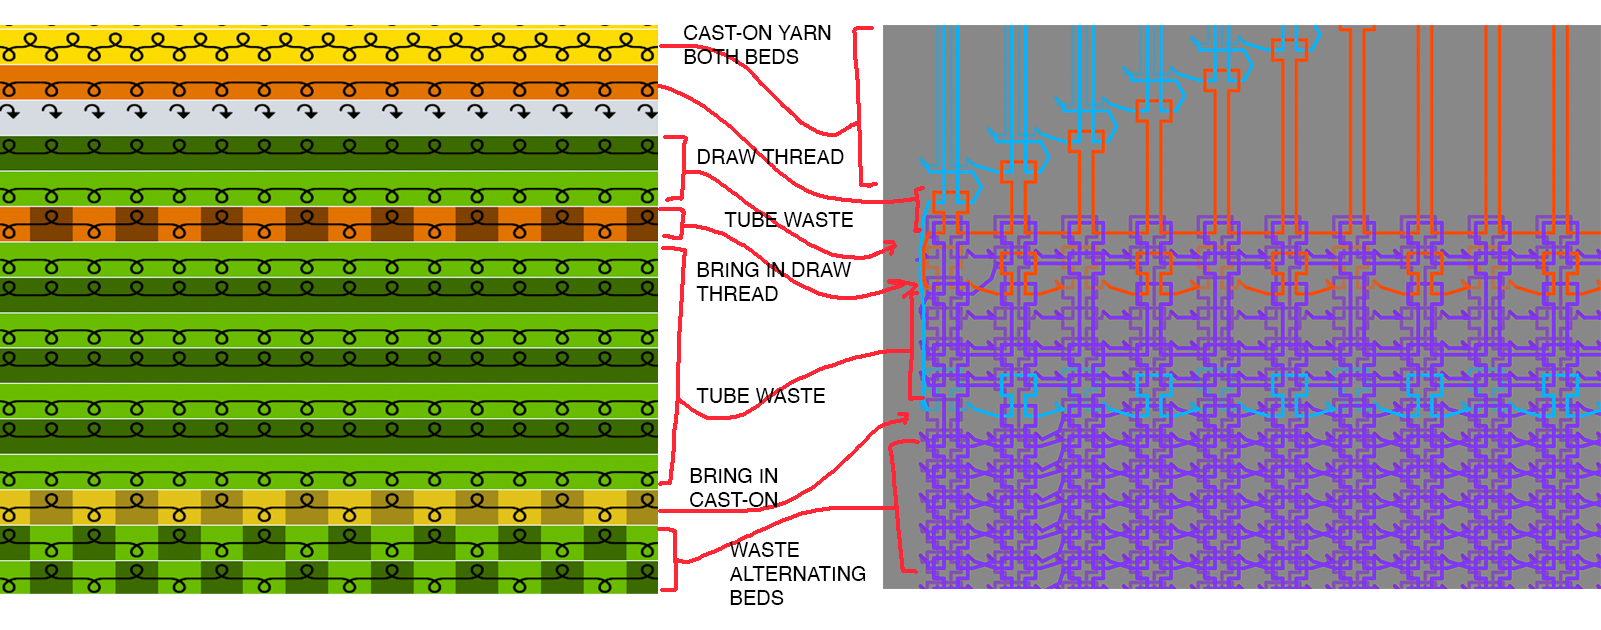 The end result file, plus details of where we think it corresponds to the visualisation in the knitout editor. Without being able to go from .kc -> .k or from .kc -> Kniterate Editor, we won't know how correct this is until we try it on the machine!
The remaining point of confusion is the very top of the waste section, where a row is knitted with every stitch on both the front and back beds in the cast-on yarn, forming the first row of the eventual knitted piece. In B’s explanation, this ‘both-beds’ row is important as it gives a nice, sturdy edge once you remove the draw thread: she showed us an example of this on one of her samples.
In the Knitout visualiser, this looks similar to a cast-off, with each successive stitch rendered on a new row. We ran out of time to test this on the machine, but will be testing it again next week – at which point we’ll hopefully resolve whether this top part is actually doing what we want it to be doing!